

You can cut a Snail's Trail quilt that looks simple at the cutting mat, then turns fussy the moment seams drift or triangles flip. The block works because the geometry is strict, and when you scale it into a whole quilt, the key decision isn't just color, it's whether your piecing, pressing, backing, and longarm plan can keep that spiral readable all the way to the finish.
What a Snail's Trail Quilt Block Actually Is
A Snail's Trail quilt block starts with a center four-patch, then grows in successive triangle rounds until the eye reads a spiral. It's a square design made from pieced triangles and squares, not curved piecing, which is why it feels straightforward until the seam lines start stacking up.
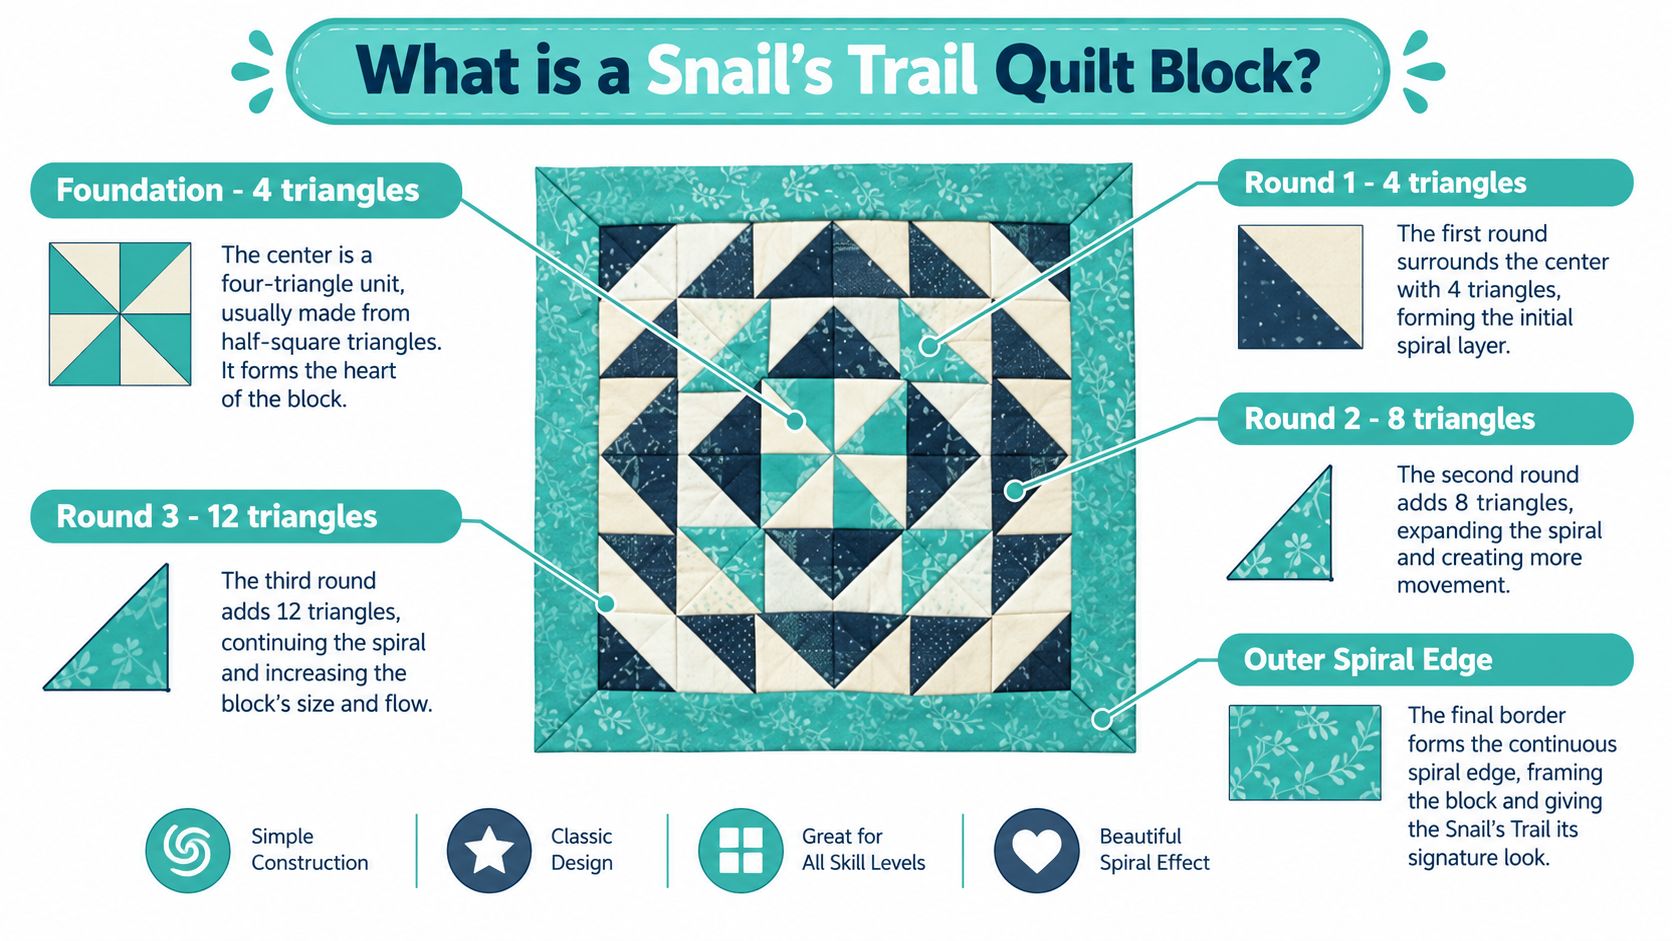
Why the spiral reads the way it does
The spiral effect comes from color placement, not from appliqué or curves. Historical references place Snail's Trail among journey-themed motifs used in friendship quilts between 1840 and the Civil War, and the same design also appears under other names like Monkey Wrench, Virginia Reel, Indiana Puzzle, and Nautilus (International Quilt Museum record).
That history matters because it explains why the block still feels adaptable. The same geometry has shown up in museum collections, including a 2000–2010 Nebraska quilt record, and it's also part of the modern barn-quilt revival that began in 2001 in Adams County, Ohio, where the Snail's Trail square was added in 2003 to Donna Sue Groves' and Maxine's tobacco barn (University of Harrisville Quilt Trail history). That sequence shows the block working both as textile logic and as public art.
Practical rule: if the seam intersections are off, the spiral doesn't look “rustic,” it just looks crooked.
What the block demands before you cut
The block is usually taught as beginner-friendly, but the part many quilters underestimate is accuracy. The spiral depends on consistent ¼-inch seams, correct orientation, and bias edges that appear on every triangle round.
A well-graded block usually has four visual roles:
- Spiral color, the fabric that carries the curl.
- Background, the fabric that makes the trail legible.
- Accent, a contrast that sharpens the turn of the spiral.
- Four-patch pop, the center that anchors the whole design.
The construction stays readable only when the HST seams land where they're supposed to land. The block can forgive a little in one square, but it doesn't forgive drift across a whole quilt.
Cutting the Center Four-Patch and First Triangles
Start with fabric that can hold a clean edge. I like to think about the first round as a test of whether your rotary cut, seam allowance, and pressing plan are already in agreement before you commit to the rest of the quilt.
The center sets everything
Cut two 2.5-inch squares from each of two contrasting fabrics. Pair them right sides together, stitch a ¼-inch seam on all sides, then press open to make a 4.5-inch unit.
That little four-patch does more than sit in the middle. It establishes the block's square center, and every later round has to respect that grid or the spiral starts wandering.
The first triangle round
For the first round, cut one 5.5-inch square from the spiral color and one 5.5-inch square from the background. Draw a diagonal line, sew ¼ inch on each side, cut apart on the line, and press toward the darker fabric to yield two 4.5-inch unfinished HSTs from each pair.
That first HST edge is where grain direction starts to matter. The bias edge created here sets the orientation for the next round, so if the seam is shallow or the unit is stretched, the whole block starts out of square before it even grows.
Here's the basic cut plan for the first round.
| Component | Cut Size (unfinished) | Pairs Needed | Finished Yield |
|---|---|---|---|
| Center four-patch squares | 2.5 inches | 4 squares total, 2 of each fabric | 4.5-inch unit |
| First-round HST squares | 5.5 inches | 2 squares | Two 4.5-inch HSTs per pair |
If you prefer a different construction style, the math shifts with it. A Strip Tube Method swap changes how you batch the triangles, but it doesn't change the fact that the block wants exact orientation and a clean square-up afterward. For layout and tool support, the 45-degree ruler guidance is worth keeping nearby because the first diagonal is where a lot of blocks go slightly wrong and never fully recover.
Four trimmed HSTs are now ready to attach to the four-patch, and that's the point where the spiral starts to appear.
Building the Spiral With Triangle Rounds
The second round is where the block stops looking like units and starts looking like a design. Once the four HSTs are attached, the block reads as 8.5 inches unfinished, and every new round has to be aligned against that existing square or the curl breaks.
How the spiral grows cleanly
The next round uses 5.5-inch HST squares in the spiral color, which again yield 4.5-inch HSTs that frame the previous round. Match the diagonal seam of the new HST to the corner seam of the existing block, pin at the intersection, and keep the HST on top so the spiral seam stays visible while you sew.
Pressing direction matters more than you might think. Press seams away from the spiral color on every round so bulk doesn't pile up at the center, and so the curl keeps reading in one direction instead of fanning out.
A useful caution from production sewing is this, a drift of 1/16 inch on round two can become 1/4 inch by round three. The math is tiny on one unit, but on a whole quilt it becomes visible fast.
If the corners don't nest, stop and fix them before the next seam. The block won't self-correct later.
Why squaring up is not optional
Once the block grows beyond your ruler's working area, square it up with a 12.5-inch square ruler. That trim keeps the outside edge honest and gives you a repeatable block size for layout.
Chain piecing helps here, but only if you stay disciplined. You can run the HST seams in batches and still preserve ¼-inch accuracy, which is the whole point of using a spiral block instead of a looser improvised square.
A lot of quilters use the block lock ruler approach for seam control on blocks like this, especially when points start crowding the center. That kind of support matters because this block is visually simple and technically sensitive at the same time.
What the finished block should give you
By the time the rounds are complete, you should have a 12.5-inch finished block ready for layout math. If the spiral is reading cleanly, the block looks crisp from a distance and layered up close, which is exactly why it scales well in the right hands and gets messy in a hurry when seams wander.
Scaling Up With Layout, Sizing, and Yardage
At the cutting table, a single Snail's Trail block stops being a sample and becomes a production decision. Choose the finished size, block count, contrast plan, and fabric roles before cutting a stack of squares. The spiral can read as texture, a bold motif, or a repeating grid that settles the eye.
The layout math you need before cutting
A 12-inch finished Snail's Trail block set 6x6 produces a 72-inch square top. The same block set 8x8 produces a top of roughly 96 inches before borders or other additions.
Sashing changes the finished dimensions and the visual rhythm. Narrow sashing gives each spiral breathing room, while cornerstones strengthen the grid and make the quilt feel more architectural. An on-point setting requires additional setting triangles and corner triangles because the diagonal blocks do not fill the edges like a straight grid.
Block size also changes how much construction error you can see:
- Small blocks read as overall texture.
- Large blocks expose every seam and point.
- Mixed contrast sharpens the spiral.
- Low contrast softens the movement and can make the trail disappear.
Yardage by role
Assign fabric by job: background, spiral rounds, and accent pieces. Keep those roles separate while planning, especially if the background is light and the spiral includes several coordinated prints. Trimming consumes fabric, and bias edges or a miscut can remove more usable pieces than the block count suggests.
Apply a 15 to 20 percent waste factor to each role rather than adding one vague allowance to the whole project. If a cutting plan requires one yard of background, plan for 1.15 to 1.20 yards. A two-yard requirement becomes 2.30 to 2.40 yards. Use the same multiplication for the spiral and accent requirements. The quilt yardage calculator guidance can help convert a cutting list into purchase yardage.
| Quilt Size | Block Grid | Finished Top Before Borders | Yardage Method |
|---|---|---|---|
| Throw | 6x6 | 72 x 72 inches | Multiply the background, spiral, and accent cutting requirements by 1.15 to 1.20 |
| Twin | 7x8 or similar | 84 x 96 inches | Calculate each fabric role from the block count, then apply 15 to 20 percent to each role |
| Queen | 8x8 or larger | 96 x 96 inches or larger | Recalculate for the final grid, sashing, and borders, then add 15 to 20 percent per role |
A busy print can blur the spiral across a large top. Cleaner contrast keeps the trail visible from across the room, while a small accent allocation can pull attention toward the center without making every round compete.
Choosing Backing, Batting, and How to Finish It
The backing choice affects the project before the last block is sewn. If the quilt is meant to live on a bed, the backing width decides whether you can use one piece, need a center seam, or have to match a wider back before the top ever reaches the frame.
Backing and batting decisions that change the finish
Standard 108-inch wide backing handles throws and most twins without a seam. Queens and kings usually need seamed backing or 120-inch wide minky, especially if you want the back to stay flat and avoid unnecessary joins.
Batting changes the way the spiral reads under quilting.
- 80/20 cotton-poly is a dependable daily-use choice.
- Wool adds warmth without much weight.
- Polyester gives a puffier loft that pushes the spiral harder and makes the quilting show more strongly.
For makers who want a softer finish, plush options can work well if the block contrast is strong enough to hold its shape through the texture. For a quick fabric pairing decision, the what to know about quilt batting guide helps you choose how much loft you want under those spiral seams.
On Pins & Needles Quilting Co. carries Shannon Fabrics textures like Hide, Snowy Owl, and Fawn, plus wide backing options that are easier to pair with a large top than pieced yardage.
Comparing finishing paths
| Method | Cost | Time | Stitch Quality | Pattern Options |
|---|---|---|---|---|
| DIY home machine quilting | Lowest equipment cost if you already own the machine | Slowest for large tops | Depends on operator control | Limited by throat space and tolerance for bulk |
| Sit-down longarm rental | Mid-range | Faster than home quilting | More consistent than a home machine | Better access to larger patterns and smoother flow |
| Mail-in longarm service | Service cost plus shipping | Fast for the quilter, depending on turnaround | Very consistent on loaded tops | Broad edge-to-edge pattern access |
A mail-in service makes sense when the top is large, the backing is bulky, or the spiral needs even stitching across every round. A bed-size snail's trail quilt can be awkward on a domestic machine, especially if the batting has more loft than the top can comfortably carry. Keeping the finishing plan in mind at the fabric stage avoids a top that looks fine on the table but fights you on the frame.
Good finishing rule: if the quilt top still feels hard to manage on your table, it will feel worse on the frame unless the backing and batting are chosen with the finish in mind.
Pressing, Prep, and Sending It to the Longarm
The work between the last seam and the shipping box decides whether the quilt loads cleanly or comes back with avoidable issues. Most problems I see at the finishing stage come from tops that were pressed in a hurry, left slightly out of square, or packed with lint and thread tails still hanging off the back.
What needs to happen before the box closes
Press every seam as you go, then give the finished top a final press from the back with a dry iron and a pressing cloth. Skip starch, because residue can gum needles and leave brown flecks under white thread.
Square the top to the finished dimensions, not just the pieced dimensions. Trim loose threads to about one-eighth inch and make sure the edges are stable enough to load without distortion.
Here's the prep that keeps mail-in finishing smooth:
- Baste or pin baste the backing, batting, and top so the package arrives flat.
- Photograph the top in daylight for the work order.
- Label the requested quilting pattern and thread color on a slip pinned to the backing.
- Ship in a breathable bag, not plastic, so the quilt arrives ready to load.
Why that last mile matters
A snail's trail top has lots of pieced edges and diagonal movement, so it tells on itself when it's been handled roughly. If the seams are pressed flat, the edges are squared, and the backing is smooth, the longarm operator can load it without fighting the quilt instead of quilting it.
If you're sending one in, the mail-in longarm prep guide is the kind of checklist that saves time on both ends. It's also where the decision to use a wide backing or a plush finish becomes much easier, because the quilt goes from “almost done” to ready for loading.
If you're ready to turn your Snail's Trail quilt top into a finished piece, On Pins & Needles Quilting Co. can help with mail-in longarm finishing and the backing choices that make a large quilt easier to manage. Visit On Pins & Needles Quilting Co. to choose your fabrics, plan the back, and get your top ready for a professional finish.