

You've arranged the diamonds, but the points keep drifting and the center refuses to line up. An 8 point star quilt block becomes manageable when you treat it as a collection of repeatable units, trim every unit accurately, and nest the seams before joining the rows. The traditional geometry then pairs beautifully with a soft modern Cuddle backing.
Understanding the 8 Point Star Quilt Block
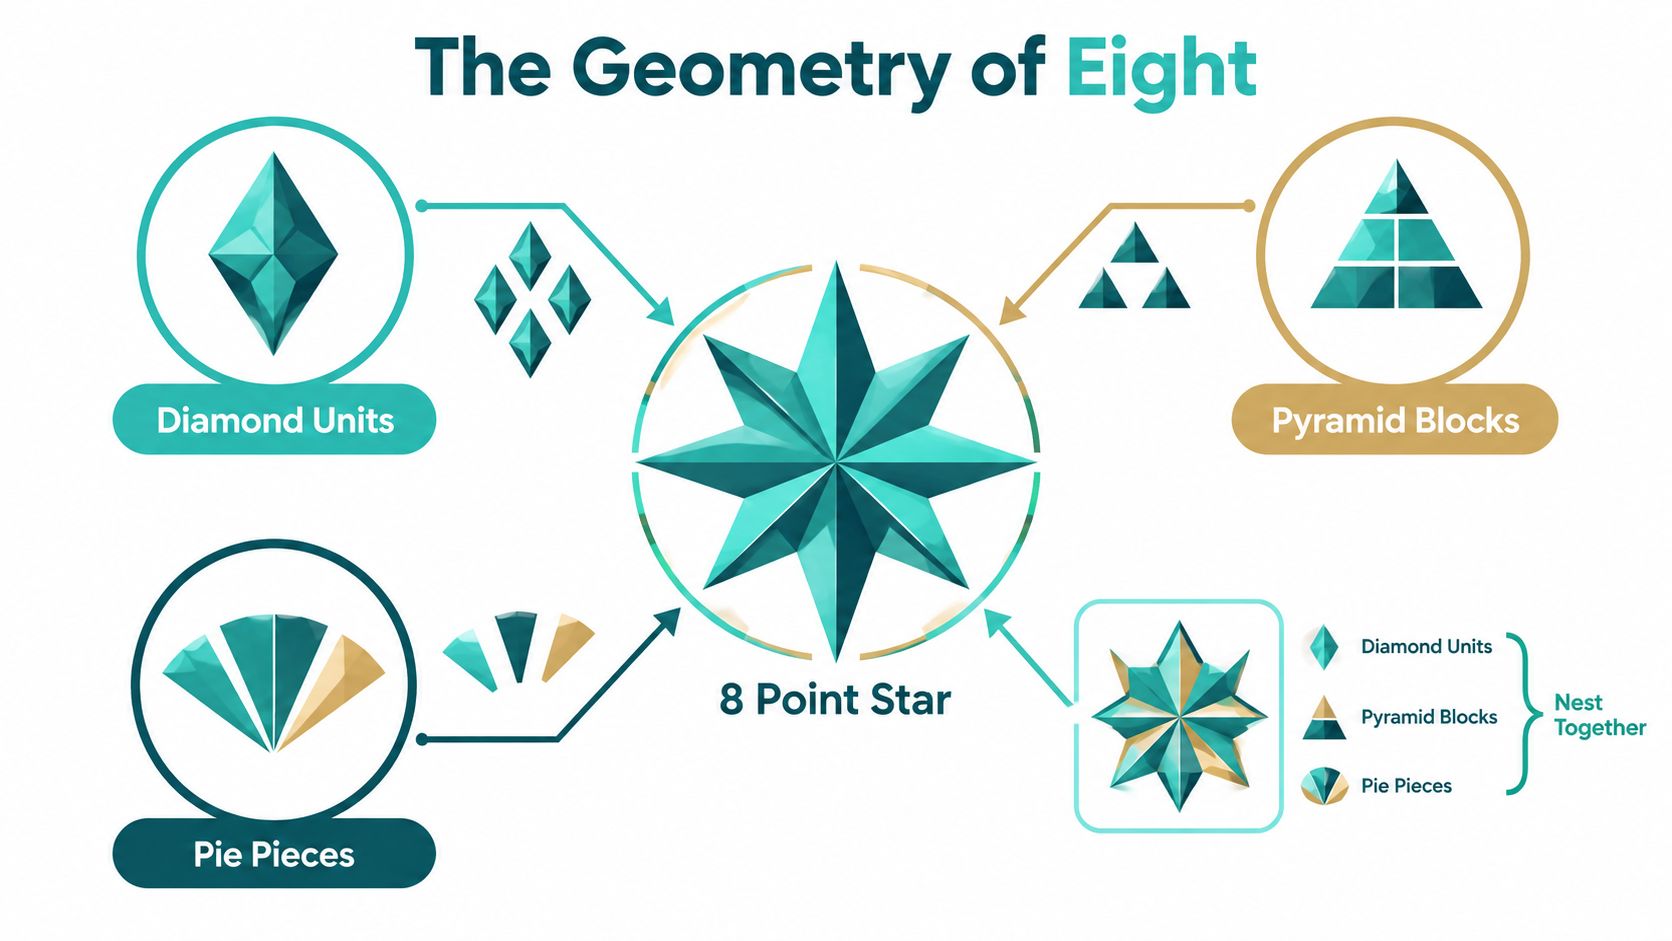
An eight-point star is built from eight diamond-shaped blades radiating from a central square. The star usually sits on point inside a larger square block, while setting triangles fill the open background around the points. That arrangement creates the illusion of a much more complicated design, even though the construction relies on a small group of repeating shapes.
The design has deep roots in quilt history. Star-pattern traditions reach back to eighteenth-century England, where one early name was the Mathematical Star, before related forms spread through the United States and acquired names such as Star of Bethlehem, Morning Star, Star of the East, Broken Star, and Lone Star. Historical accounts also connect the eight-blade star with Northern Plains Indigenous star quilts, where the motif became a long-lived cultural symbol. The North Dakota historical publication on star quilts documents the eight-blade structure and its development in Native communities.
What units make up the star?
You'll work with three main unit families:
- Diamond units form the eight visible points. Their angled edges create the star's rays.
- Half-square triangles help form the inner corners and can replace more demanding inset seams.
- Setting triangles fill the background between the star and the outer edges of the block.
Each unit carries a seam allowance, so a tiny error can multiply where several seams meet. That's why a point may look correct on its own but disappear after you sew it into the center.
A practical twelve-inch block often uses a six-inch center square, four three-inch corner squares, four three-by-six-inch flying-geese units, and a seven-and-a-quarter-inch square cut to produce the necessary triangles. This documented eight-point star construction teaches several essential skills at once, including center placement, point alignment, and triangle construction.
Before cutting, decide whether you want the precision challenge of traditional diamond piecing or the more approachable route using half-square triangles and flying geese. Our guide to easy quilt block patterns is a useful companion if this is your first geometric block.
Cutting and Fabric Prep for Clean Points
A clean star begins before the rotary cutter touches fabric. Press the yardage flat, square one edge, and keep the grainline consistent. This matters especially for diamonds and triangles, because their angled edges can stretch while you cut and sew.
Choose three fabric roles:
- Contrast star fabric creates the eight points and should stand clearly against the background.
- Background fabric fills the setting triangles and corner areas.
- Accent print can highlight the center or a selected diamond. Fussy cutting works best when the print has a clear motif that can remain visible after the piece is rotated.
Directional fabric deserves a deliberate plan. A diamond may need to be cut with the print running toward the point, while a half-square triangle can reverse direction when rotated. Mark the intended orientation on paper first, then place the fabric so you're not discovering a pattern reversal after sewing.
How should you calculate the cuts?
Start with the finished block size and add the seam allowance required by your chosen pattern. For a twelve-inch example, the documented unit plan uses the following pieces:
| Unit | 8-inch block | 12-inch block | 16-inch block |
|---|---|---|---|
| Center square | Scale from the chosen pattern | 6-inch center square | Scale from the chosen pattern |
| Corner squares | Scale from the chosen pattern | Four 3-inch squares | Scale from the chosen pattern |
| Star points | Scale from the chosen pattern | Four 3-by-6-inch flying-geese units | Scale from the chosen pattern |
| Triangle source square | Scale from the chosen pattern | One 7 1/4-inch square | Scale from the chosen pattern |
| HST pairs | Use the pattern's unfinished measurement | Use the pattern's unfinished measurement | Use the pattern's unfinished measurement |
The smaller and larger columns are planning guides, not substitute patterns. A reliable resizing method keeps the geometry proportional, then verifies the unfinished unit measurement before assembly. Don't add a guessed amount to a diamond's long edge. Draft one enlarged unit on paper, check that the angles remain consistent, and use a 45-degree ruler guide to confirm the angle before cutting a full set.
How can you keep the pieces organized?
Starch lightly if your fabric has a loose weave or if the bias edges feel unstable. Let the fabric dry, press it flat, and avoid dragging the iron across the surface because that can distort the grain.
Label each pile with painter's tape:
- S, for star fabric.
- B, for background.
- C, for corner or accent pieces.
- L and R, when a directional unit needs a specific orientation.
Cut a test unit first. If its points reach the intended unfinished edge and its center seam is straight, continue with the rest. A few minutes of checking now can prevent an entire star from becoming subtly uneven.
Building Flying Geese and Half-Square Triangles
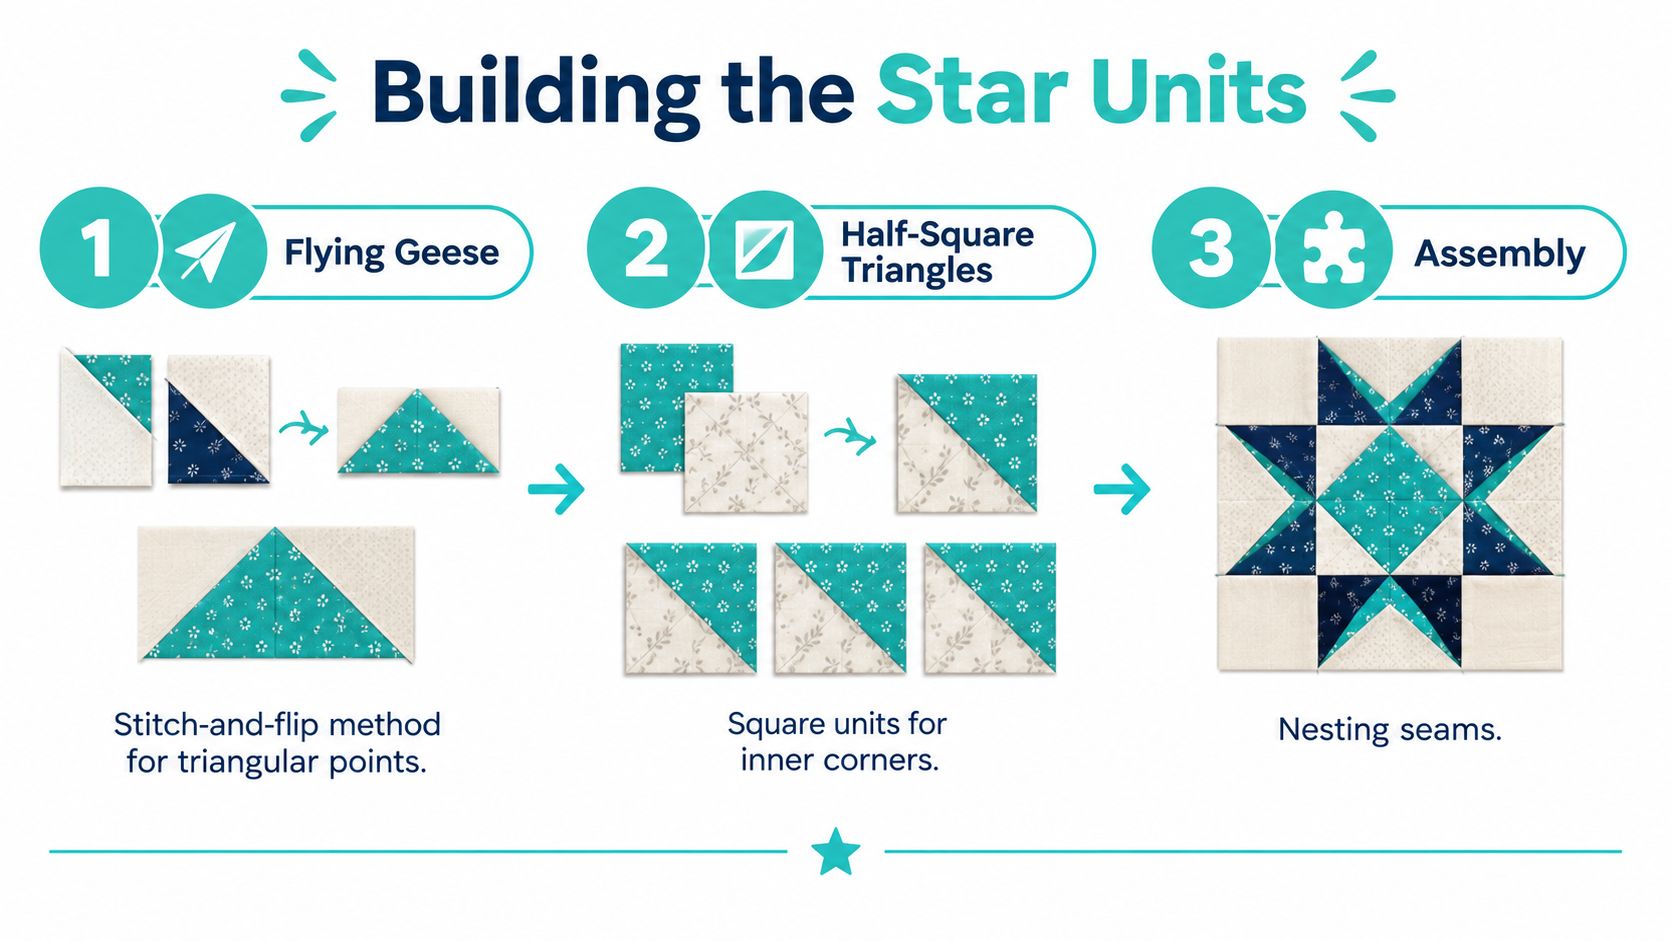
The stitch-and-flip method is a dependable way to make star points without beginning with complicated inset seams. Place a small background square on one end of a rectangle, right sides together, and draw a diagonal line across the square.
Sew directly on the marked line. Trim the excess fabric a quarter inch from the seam, then press the small triangle open toward the background. Repeat on the opposite end of the rectangle. Keep the pressing direction consistent so the finished geese can nest neatly during assembly. This documented stitch-and-flip method uses the same sequence for creating a flying-geese-style point.
How do you make the half-square triangles?
For an HST, place a star square and a background square right sides together. Draw a diagonal on the wrong side of the lighter fabric, then sew a quarter-inch seam on both sides of that line.
Cut on the marked diagonal and open the two resulting units. Press the seam open, or press it toward the darker fabric if that suits your assembly plan. A wooden dowel or seam roller lets you finger press first, which reduces the chance of stretching the bias edge before the iron touches it.
The unfinished HST must be trimmed to the exact measurement required by the pattern. Use a square ruler, align the diagonal seam with the ruler's diagonal markings, and trim only after the unit has been pressed. A slightly oversized unit can be corrected, but an undersized unit can leave a gap at the star's inner intersection.
Practical rule: Test your quarter-inch seam on a scrap sandwich before sewing the star fabric. The seam should be accurate enough that the unit reaches its intended unfinished size without forcing the fabric.
One documented variation builds an eight-point star from twelve HSTs and four plain squares, creating a simpler version of the geometry associated with the LeMoyne star. The HST variation and its unit count show how repeated square units can replace more demanding diamond work.
What should be ready for layout?
Before leaving the cutting table, check that you have:
- Four completed flying-geese point units.
- The required HST units, trimmed consistently.
- The center square.
- Four corner squares.
- The side and corner setting triangles.
- A labeled layout diagram or photograph.
If you use specialty rulers, a Block-Lock ruler guide can help you understand how a trimming system holds a seam in place while you square the unit.
Four Construction Methods Worth Knowing
The same 8 point star quilt block can be pieced in several ways. Your choice depends on how much you enjoy precision work, whether the fabric has a directional motif, and how much waste you're willing to manage.
Traditional diamond piecing gives the most direct connection to the historic design. You sew the diamonds with inset Y-seams, which means three seams meet at selected intersections. The result can be exceptionally crisp, but the method demands careful marking and a willingness to stop short of the seam intersection rather than sewing beyond it.
Strip piecing with HSTs simplifies cutting and gives beginners a more forgiving entry point. You build repeatable square units, trim them, and arrange them so their diagonal seams create the star points. This is the method I'd recommend for a first finished twelve-inch block because it teaches accuracy without requiring every junction to be an inset seam.
Foundation paper piecing suits fussy-cut prints and quilters who want a strong paper guide. The printed lines control the angle, while the fabric can be positioned precisely behind the template. The tradeoff is that you'll remove paper later and must watch the seam allowance at every section edge.
Stitch-and-flip flying geese are efficient for the outer points. They use familiar squares and rectangles, and they're easy to repeat. Their weakness is that a small shift in the diagonal marking can move the point, so consistent marking and trimming matter.
| Method | Units built | Skill level | Point accuracy | Best for |
|---|---|---|---|---|
| Traditional diamond Y-seams | Individual diamonds and inset joins | Confident intermediate | High with careful marking | Historic construction and hand piecing |
| Strip-pieced HSTs | Repeated square triangle units | Beginner friendly | Reliable after trimming | A first geometric star |
| Foundation paper piecing | Printed angled sections | Intermediate | Very controlled | Fussy-cut and directional prints |
| Stitch-and-flip geese | Rectangles and corner squares | Beginner friendly | Sharp when marked consistently | Fast repeatable star points |
A tutorial that uses twelve HSTs and four plain squares demonstrates why the HST route can resemble the more demanding LeMoyne star while keeping the pieces approachable. That documented comparison is useful when you're choosing between traditional diamond work and simplified square units.
Laying Out and Sewing the Block Together
Put every unit on a design wall or a large flat surface before sewing. Arrange the eight points, four corner squares, center square, HSTs, and setting triangles, then take a quick photograph. A star can look correct from a distance while one point faces the wrong direction.
Start with the outer arrangement. Place the top points so they radiate toward the upper edge, then position the side points around the center. The four corner squares belong outside the star, while the setting triangles fill the larger spaces between the points and the block edges.
How should you sew the rows?
Work horizontally rather than joining random pairs:
- Top row: Place the upper points and the corner or setting units according to the pattern diagram.
- Middle row: Arrange the side points around the center square. Check that every point aims toward the center, not away from it.
- Bottom row: Mirror the top row rather than rebuilding it from memory.
Sew with a consistent quarter-inch seam. Pin each star-point junction before it reaches the presser foot, and remove the pin before sewing over it. If a point looks slightly short, stop and compare the seam allowance instead of stretching the fabric to force the edges together.
Press adjoining rows in alternating directions. This allows one seam allowance to lie toward you and the next to lie away from you, so the seams lock together rather than stacking into a bulky ridge. At the center, that nesting keeps the Y-intersection stable and helps the eight points meet around the square.
Where does the final seam go?
Join the rows slowly, checking the center after each few inches. Don't pull the fabric as you sew, because the bias edges can lengthen and create a wavy outer edge.
A tutorial for this block recommends laying out all the units first, matching the HST corners, and nesting the center seams before the final join. This assembly guidance for an 8-point star reinforces a habit that saves many uneven centers: arrange, match, pin, sew, then press.
Press the finished block from the back first. Turn it over for a light final press, and trim only if the pattern calls for trimming at that stage. The goal is a flat block with visible star points, not a block forced into size by aggressive pressing.
Accuracy and Pressing Tips for Sharp Stars
Most point problems begin with one of three causes: an inconsistent seam allowance, a stretched bias edge, or a unit that wasn't trimmed before assembly. The cure isn't more force at the sewing machine. It's a repeatable check at each stage.
Make a seam test with spare fabric. Sew two pieces together, press them, and measure the result against the pattern's unfinished measurement. If the unit is too large or too small, adjust the needle position or seam guide before cutting into the star fabric.
Starch can stabilize the bias edges of diamond and triangle units, but use a light touch. Finger press each seam before setting it with the iron, then press rather than scrub across the surface. Pressing seams toward the background can reduce bulk at intersections and keep the star fabric visually prominent.
| Problem | Likely cause | Fix |
|---|---|---|
| Star tips are clipped | The seam line crossed into the point | Mark the sewing line and check the point before joining |
| Points disappear into seams | The seam allowance is too wide or the units are misaligned | Match the point, pin at the junction, and verify the quarter-inch seam |
| Center intersections don't match | Seams were pressed in the same direction or units differ in size | Alternate pressing directions and trim units before assembly |
| Block edges wave | Bias edges stretched during pressing or sewing | Starch lightly, press without dragging, and handle the block gently |
A useful iron guide for sewing can help you build a steady press-as-you-sew rhythm. Sew one unit, press it, and check it before making the next. That habit catches a reversed point while the repair is still small.
For final blocking, use steam carefully and square the block with a ruler. Align the ruler with the center seams and outer edges, then true the block without trimming away the points. A flat, accurately squared top will also behave better when you add batting and a soft backing.
The iron should settle the seam, not reshape the block. If you have to stretch a point into position, stop and inspect the unit underneath.
Project Ideas and Finishing With Minky
An eight-point star works at several scales. A single block can become a pillow cover, while repeated blocks can form a wall hanging, a baby quilt, or a larger throw. Sashing gives each star breathing room, low-volume prints soften the background, and cornerstone squares can emphasize the grid between blocks.
For a small wall piece, use a compact arrangement of blocks and let the star remain the focus. A baby quilt benefits from repeated blocks separated by calm background fabric. For a larger throw, a four-by-four layout creates a strong field of stars, especially when the cornerstones echo the center fabric.
| Project | Finished size | Block layout | Yardage for top |
|---|---|---|---|
| Mini wall hanging | Plan around the selected block size | Four blocks or one oversized block | Calculate from the block pattern and borders |
| Baby quilt | Choose the finished size before cutting | Nine blocks with low-volume sashing | Calculate blocks, sashing, borders, and binding separately |
| Throw quilt | Use a four-by-four arrangement | Sixteen blocks with cornerstones | Calculate the full layout before purchasing fabric |
| Pillow cover | Based on one finished block | One centered star | Add the allowance required for the envelope or zipper finish |
Why does minky make a useful backing?
Cotton piecing gives the star its structure, while Cuddle adds softness and warmth. Shannon Fabrics textures such as Hide, Snowy Owl, and Fawn can change the character of the finished quilt without competing with the geometric top. A smooth backing keeps the star visually quiet, while a raised texture turns the quilt into a tactile gift.
Pre-wash the cotton top if that's part of your usual process, but follow the care guidance for the minky you choose rather than treating it like quilting cotton. Use a needle intended for stretch fabrics, lengthen the stitch slightly, and pin-baste frequently because the plush surface can conceal small shifts.
Avoid dense quilting that crushes the pile. A simple echo around the star or a generous meander usually preserves more of the soft texture than tightly packed quilting. Before quilting, smooth the backing from the center outward and check that no nap has folded under the top.
For a large quilt, OPN's mail-in longarm service offers edge-to-edge quilting with batting, thread, and return shipping included. On Pins & Needles Quilting Co. also carries Shannon Cuddle and Luxe Cuddle fabrics, including extra-wide backing options, pillow kits, and textures such as Hide, Snowy Owl, and Fawn. The shop reports hundreds of verified reviews, and its first-order offer provides 15% off, while orders over $70 qualify for free U.S. shipping. Check the current terms before ordering.
When your top is ready, read how to bind a minky quilt for beginners before cutting the backing and binding. That preparation helps preserve the soft finish you worked to create.
On Pins & Needles Quilting Co. offers premium minky fabric and mail-in longarm finishing for quilts built around an 8 point star quilt block. Visit On Pins & Needles Quilting Co. to choose a Cuddle backing, use the available first-order offer, and book your longarm service when the top is ready.