A DIY minky infinity scarf kit is simple to assemble: sew the pre-cut minky fabric into a tube, give it one twist to form the infinity loop, then sew the ends together and leave a small opening so you can turn it right side out and stitch it closed. If you're staring at a pile of plush fabric and wondering whether this will be messy, slippery, or harder than it looks, the good news is that this is one of the most approachable minky projects you can make.
A DIY Minky infinity scarf kit works because the project is simple, the seams are forgiving, and the finished scarf looks far more polished than the skill level it requires. That's exactly why it has stayed popular with beginners, gift makers, and small batch sellers.
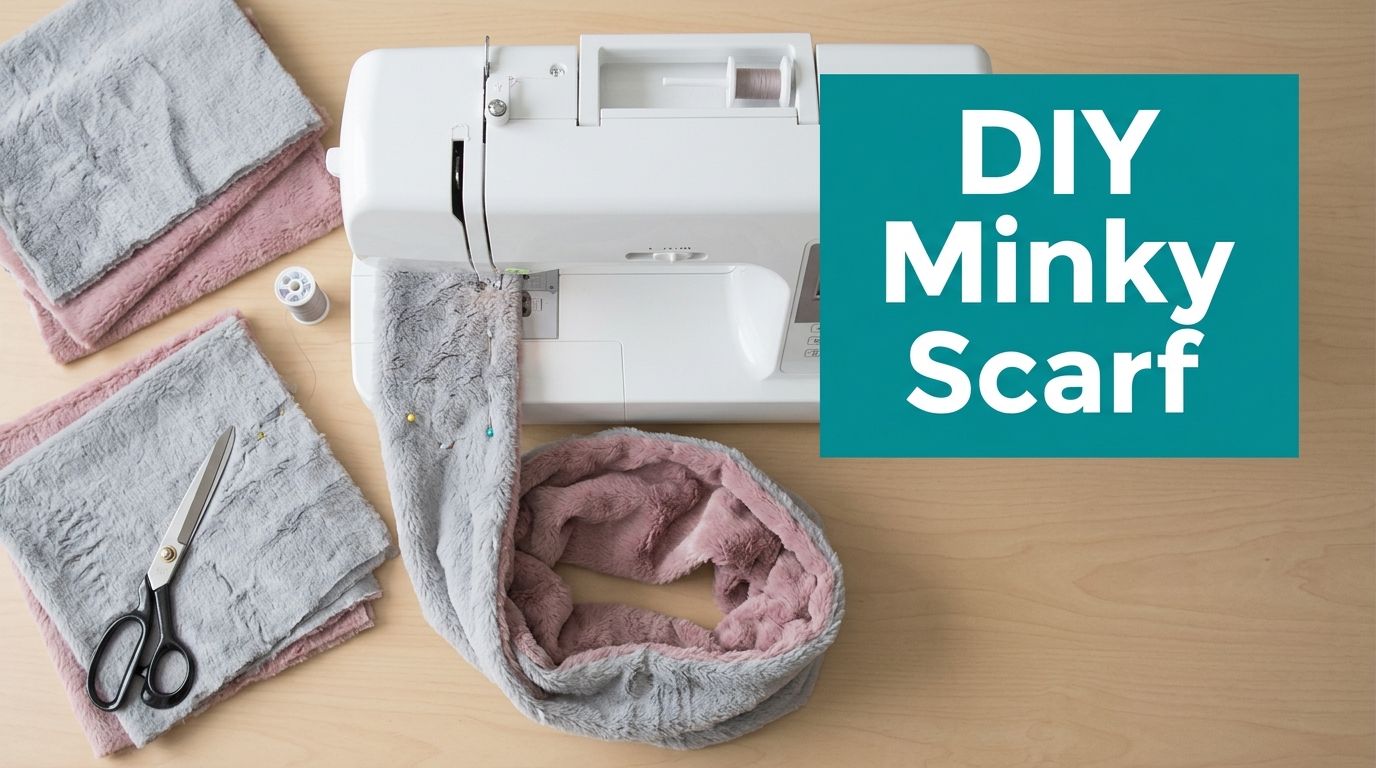
What Comes Inside Your Minky Scarf Kit?
You sit down expecting a quick afternoon project, then lose time trimming plush fabric, chasing stray fluff, and second-guessing whether the nap is running the right direction. That is the part a good kit removes. The project stays simple because the setup work has already been handled for you.

A well-built DIY Minky infinity scarf kit is less about adding extras and more about removing beginner mistakes before they happen. For a project like this, that matters. Minky is very forgiving once the scarf is finished, but the cutting and prep stage can frustrate new sewists fast.
What you should expect in the kit
A practical kit usually includes the pieces that affect the final result most:
- Pre-cut or project-ready minky fabric, so you can skip full-yard handling and get straight to construction
- A selected texture option that suits scarf making, whether you want a smoother finish or a fuller, more plush look
- Clear instructions for sewing the tube, adding the twist, turning the scarf, and closing the opening neatly
- A beginner-friendly project format with no piecing, matching points, or pattern layout decisions
You can see the current DIY minky infinity scarf kit options if you want to compare textures and color choices.
Why the pre-cut format matters
I have watched plenty of beginners do fine at the machine and still get discouraged during prep. Raw yardage brings extra decisions. You need to square it, check pile direction, and cut cleanly without stretching the backing or filling the room with fluff.
A pre-cut kit trims that learning curve down to the part that teaches useful sewing skills.
That is especially helpful with richer textures such as Hide, Snowy Owl, or Fawn. They make a beautiful scarf, but the loft can hide a wobbly cut line and add bulk if the edges are not prepared well. Starting with pieces chosen for this exact project gives you a better shot at a polished finish on the first try.
Pro tip: Beginners usually get a better result from fewer decisions, not more options. If the size, cut, and fabric pairing are already sorted out, it is much easier to focus on stitch control and finishing the hidden opening cleanly.
Who gets the most value from a scarf kit
This project works well for several kinds of makers:
- New sewists who want a first project that looks polished and feels giftable
- Holiday makers who need a fast, repeatable handmade accessory
- Parents and grandparents sewing soft wearable gifts without a steep learning curve
- Small batch sellers who want an easy item they can make consistently
At OPN, we work with minky every day, and scarf kits solve the beginner problems we see most often. They cut down on prep frustration, help you start with an appropriate texture, and make it much easier to finish with a scarf that looks intentional instead of homemade in the wrong way.
How Do You Choose the Right Minky Texture?
A scarf can look polished at the cutting table and still disappoint once it is turned right side out. The usual reason is texture choice. A pile that is too lofty can create a bulky hidden opening, while a flatter fabric can sew beautifully but look plain if you wanted that plush winter feel.
For this project, texture affects three things more than anything else. How easily the fabric feeds, how bulky the seam feels, and how much visual interest the finished loop has when you put it on.
What changes from one minky type to another
The two factors that matter most are pile height and surface texture. Lower, smoother piles stay more stable under the presser foot and give beginners a little more control. Higher piles and sculpted textures give the scarf more presence, but they ask for better seam management at the turning opening.
That trade-off can be worth it on a scarf because the construction is simple. You are working with long seams and a soft drape, not tight curves or pieced blocks.
Minky Texture Comparison for Infinity Scarves
| Minky Type | Pile Height | Best For | Example Texture |
|---|---|---|---|
| Cuddle 3 | Lower pile | Beginners who want easier feeding and less seam bulk | Smooth solid Cuddle |
| Embossed or dimple minky | Textured but controlled | A modern scarf with visible surface pattern | Dimple-style texture |
| Luxe Cuddle | Higher pile | Maximum softness and a more luxurious gift look | Hide |
| Luxe Cuddle | Higher pile | Cozy winter accessory with visual depth | Snowy Owl |
| Luxe Cuddle | Higher pile | Soft, plush finish with a faux-fur look | Fawn |
If you want a broader primer before you choose, this guide on what Cuddle minky fabric is gives a useful overview of how these bases behave in real sewing.
Which texture works for which goal
For the easiest first scarf, choose a lower pile or a controlled texture. The seam will sit flatter, the layers will shift less, and closing the opening is usually simpler.
For a softer, fuller scarf with more visual depth, Luxe Cuddle is often the better fit. Textures like Hide, Snowy Owl, and Fawn are ideal for that purpose. They give a simple infinity scarf the kind of rich surface that makes it feel intentionally made, not like a practice run.
I usually tell beginners to decide what matters more on their first scarf. Easier handling, or a more dramatic finish. Both are good choices. They just sew differently.
A simple pattern looks more finished when the texture matches the job.
What usually doesn't work as well
Very busy prints can make nap direction harder to judge, and that can leave the scarf looking uneven once it is worn. Extra-lofty textures can also build up at the final closure if the seam allowance is not finger-pressed and kept under control.
Those fabrics are not a mistake. They just reward patience and cleaner finishing.
That is one reason a pre-selected kit helps. At OPN, we match this project with textures that still feel plush but do not make the beginner steps harder than they need to be.
How Should You Prepare Your Fabric for Sewing?
You cut into plush fabric, and within seconds the table is covered in fuzz. That moment throws a lot of beginners off more than the sewing does.
Good prep keeps this project calm. It also makes the hidden closing seam much easier later, because the fabric feeds straighter and the edges stay where you put them.

What the standard scarf cut looks like
Most infinity scarf kits use a simple, efficient cut that gives the scarf enough fullness without making it bulky at the neck. The usual piece is a rectangle cut from the width of minky, sized to create a soft loop once sewn into a tube and twisted closed.
That standard works well for beginners for a reason. You get a scarf that feels plush and finished, but you are not wrestling an oversized piece under the machine or trying to hide a thick final seam.
At OPN, that balance matters. A beginner project should still look gift-worthy when it is done.
How to control the fluff before you sew
Clean cutting and cleanup make a bigger difference than many new sewists expect. Minky sheds most at the cut edge, so the goal is to contain the mess before it reaches your machine, your seam line, and your patience.
Use this sequence:
- Keep the fabric flat on a mat and cut with a rotary cutter for a cleaner edge and less distortion
- Lift the cut piece and give it a good shake away from the machine area
- Use a lint roller on the raw edges to remove loose fibers before they get trapped in the seam
- Check nap direction before clipping anything together so the finished scarf looks consistent when worn
If you want a cleaner cutting routine, this guide on how to cut minky fabric without the mess walks through the process I recommend.
What to set beside your machine
You do not need specialty tools, but a few basics save time and prevent rework.
- Clips instead of a lot of pins because thick plush shifts more when it is overhandled
- A lint roller nearby for the table, your sleeves, and the machine bed
- A seam ripper within reach in case the twist goes the wrong way before the final join
- A small scrap of the same minky to test stitch length and feeding before you touch the scarf
A clear table helps more than people expect. Plush fabric picks up lint, catches on clutter, and stretches out of shape if part of it hangs off the edge while you are lining things up.
What beginners often skip
They match the fluff instead of the fabric base.
Before sewing, part the pile with your fingers and line up the backing edges. That is the edge that determines whether your seam stays straight. If the fibers meet but the knit backing is off, the tube will twist unevenly and the closing seam will be harder to hide.
This is also where fabric quality shows up fast. Stable backing, controlled stretch, and a well-chosen texture make prep easier and give you a cleaner result with less fuss. That is one reason a kit can save a beginner from the most common frustrations before the machine is even threaded.
What Is the Correct Sewing Process for an Infinity Scarf?
You can do every prep step right and still end up with a scarf that twists the wrong way or has a lumpy join. The project is beginner-friendly, but the sewing order is what makes it come out looking polished instead of homemade.
Slow, controlled sewing works better than rushing on minky.

What machine setup works best
Set the machine up for control before you start the first seam. For most knit-backed minky, I recommend:
- A stretch needle to reduce skipped stitches
- A slightly longer stitch length so the seam does not disappear too tightly into the pile
- A walking foot, if you have one to help both layers feed evenly
- A quick scrap test to check feeding, stitch formation, and seam appearance
If the fabric tends to creep under your presser foot, this guide on how to sew with minky fabric without it sliding will help you correct that before it throws off the whole scarf.
How Do You Sew the Main Seam?
Fold the fabric lengthwise with right sides together, then match the long raw edges. Clip enough to keep the backing aligned, especially near the ends and the center.
Sew the full long edge to make a tube. Keep your hands relaxed and guide the fabric instead of pulling it flat. Stretching plush fabric while sewing is one of the fastest ways to get a wavy seam.
Check alignment as you go. If one layer starts creeping ahead, stop with the needle down, lift the foot, and ease the layers back into place.
My rule for minky: watch the backing edge, not the fluff. The pile moves around. The base fabric tells you whether the seam is actually straight.
How Do You Create the Infinity Twist?
Lay the tube flat and bring the short ends toward each other. Before clipping those ends together, give the tube one full twist.
That single twist creates the infinity shape. Without it, you still get a loop scarf, but it wears differently and does not drape the same way around the neck.
This is the point where beginners often second-guess themselves, so stop and check it before sewing. If the tube feels tangled in your hands, flatten it again and confirm you only added one twist.
To visualize the hand position and sequence, this video is a useful companion while you sew:
How Do You Sew the Ends Together?
With the twist set, match the short ends right sides together and clip around the opening. Leave a small section unsewn so you can turn the scarf right side out after stitching.
As you sew that curved join, pay attention to the bulky spots where several layers stack up. Slow down there. Finger-comb the pile away from the seamline before it goes under the needle so fewer fibers get caught in the stitches.
A modest turning gap is usually enough on this project, as noted earlier. Bigger is not always better here. A larger opening gives you more hand sewing later, and that final closure is easier to hide when the gap stays reasonably small.
If turning feels awkward, feed the scarf through a section at a time. Pulling hard can stress the seam or distort the shape.
What tends to go wrong
Three problems show up again and again on first scarves:
- The twist is missing or reversed, so the scarf wears like a plain loop
- The long seam gets stretched during sewing, which causes rippling
- The turning opening lands in an awkward spot, making the final hand-stitched area easier to see
None of these mistakes ruin the project. They just affect the finish.
This is also where fabric choice pays off. A stable, good-quality minky is easier to feed, easier to turn, and much easier to close neatly at the end. That is one reason beginners usually have a smoother experience with a coordinated kit instead of mixing unknown plush fabrics on their first attempt.
How Can You Achieve a Professional Finish?
The difference between “nice handmade” and “where did you buy that?” usually comes down to the last few minutes.
On a minky scarf, the finishing step that matters most is closing the turning gap neatly. If that seam looks bulky or obvious, the whole project reads less polished.
How do you close the gap invisibly
A ladder stitch is the cleanest choice for this fabric because the pile hides the thread well.
Use this method:
- Fold the seam allowance inward on both sides of the opening
- Thread a hand needle with a matching thread and knot the end
- Take a small bite from one folded edge, then the other, alternating back and forth across the gap
- Pull gently every few stitches so the opening closes without puckering
- Bury the final knot in the pile instead of clipping it right on the surface
For thread guidance, this article on the best thread for sewing minky fabric helps with practical selection.
What improves the look right away
After the scarf is closed, don't stop at “done.”
Do these finishing moves:
- Fluff the seam with your fingers to free any trapped fibers
- Use a pin or awl carefully to tease pile out of the stitched area
- Check the twist and drape on the body rather than judging it flat on the table
The pile often hides small imperfections once you lift the fibers back out of the seam.
What not to do
Don't press minky directly with an iron. Heat can crush the pile and change the surface.
If you need to relax a seam, use your fingers, a cool setting from a distance, or gentle steam with care and no direct contact. The goal is to preserve loft, not flatten it into obedience.
For readers who'd rather skip the sewing and compare their finish expectations to a completed version, ready-made minky scarves are a useful reference point for drape, texture, and seam subtlety.
How Do You Style and Care for Your New Minky Scarf?
You finish the last stitch, pull the scarf over your head, and the first thing you notice is how much the texture changes the look. The same pattern can read casual, polished, or extra plush depending on the minky you chose. A Hide scarf has a cleaner, flatter look. Snowy Owl shows more loft and gives the scarf a softer, fuller presence.
That is one reason beginners get better results from a project-ready kit. You are not just picking a color. You are choosing the surface, drape, and bulk you want to wear.
How can you wear it without overthinking it
Start by trying it on in front of a mirror instead of judging it in your hands. Minky behaves differently on the body than it does folded on a table.
These two styling options cover most outfits:
- Single loop for a relaxed drape that shows off the texture
- Double loop for a closer fit and more warmth around the neck
Texture changes the final look more than many new sewists expect. Smoother minky blends easily into everyday wear. A deeper Luxe or embossed texture stands out more and pairs well with simple coats or solid tops.
How should you wash and dry it
Good care keeps the pile soft and keeps the scarf looking full instead of worn down.
Use these habits:
- Wash on a cold, gentle cycle when it needs cleaning
- Use a mild detergent without heavy fragrance or residue
- Skip fabric softener because it can leave buildup on the fibers
- Tumble dry on low or air dry based on your machine and preference
I tell customers to wash minky less often than they wash a basic cotton accessory. Spot cleaning and airing it out between wears can go a long way. Too much washing, even when done correctly, gradually reduces that fresh plush look.
What helps it stay presentable between washes
Daily handling matters.
A few simple habits help the scarf keep its shape and finish:
- Shake it out after wear if the pile was compressed under a coat
- Store it loosely instead of packed into a tight drawer or bin
- Smooth matted spots with your hand so you do not rough up the pile
For makers who enjoy this project and want to branch out, scarf sewing often leads naturally into minky pillow kits or larger cuts of minky fabric by the yard. And if your sewing moves from accessories into quilts, our Mail-in Longarm service is there for the finishing stage.
If you're ready to make your own DIY Minky infinity scarf kit, start with project-ready materials that remove the hardest parts of minky prep and let you focus on the sewing. Browse the curated textures and kits at On Pins & Needles Quilting Co., then Get 15% Off Your First Order.