You're probably standing over a cutting mat right now, staring at a piece of minky and bracing for the fluff storm. How to cut minky fabric without the mess comes down to one core move: cut from the backing with a sharp tool, keep the fabric flat in a single layer, and handle the pile as little as possible.
That one shift changes everything. In our shop, it's the difference between a controlled cleanup and a room full of polyester fuzz, especially when we're working with Shannon Cuddle and thicker Luxe Cuddle textures like Hide, Fawn, and Snowy Owl.
URL slug: opnquilting.com/blog/how-to-cut-minky-fabric-without-the-mess
If you're still choosing fabric for your project, start with the Luxe Cuddle collection or browse Shannon Cuddle yardage before you cut.
Why Does Minky Fabric Shed So Much When Cut?
Set a piece of Luxe Cuddle Hide on the table, make one fast cut across the face, and you will see the problem right away. The shedding starts because the blade disturbs the plush pile, not because the backing is falling apart.
That matters, because the fix starts with understanding where the mess comes from. Minky is a knit backing with a dense polyester nap attached to it. When the cut goes through the pile from the top side, loose fibers release along the edge. Shannon Fabrics makes the same point in their guidance on common minky cutting problems, which is why they recommend cutting in ways that disturb as little pile as possible.

What's happening at the cut edge
A clean minky cut separates the backing while leaving more of the nap in place. A rough cut shears through the plush itself, and that is what creates the fuzzy halo on your mat, ruler, shirt, and floor.
In our shop, this shows up differently depending on the texture. Shannon Cuddle 3 usually behaves well with a sharp 45 mm rotary cutter. Luxe Cuddle Fawn, Hide, and Snowy Owl often need a slower hand, and sometimes scissors give better control around tight shapes or shorter cuts. The trade-off is simple. A rotary cutter is faster on long, straight runs, while scissors can reduce drag on thick or high-loft textures where the pile wants to push back.
Why some textures feel messier than others
Pile height changes everything.
Flat minky and lower-profile Cuddle release less visible fluff because there is less fiber standing up at the cut line. Dense Luxe textures have more loft, more movement, and more material to disturb, so the mess looks worse even when your technique is decent. That is one reason newer sewists get frustrated. They are not failing. They are often starting with a texture that gives less margin for error.
If you want a clearer picture of how cuddle is built before you cut it, this explanation of what cuddle minky fabric is helps.
One more shop truth. Some shedding is normal. The goal is not zero fluff. The goal is controlling where it goes, choosing the right tool for the texture in front of you, and knowing when a bulky Luxe Cuddle cut is worth handing off to a shop that cuts it all day.
How Should You Prepare Your Workspace for Cutting Minky?
A messy cut usually starts with a bad setup. If the fabric is sliding, hanging off the table, bunching near your ruler, or picking up static from carpet, you're already behind.
The cleanest workspace for minky is boring. That's the goal.

What should be on the table before you unfold the fabric
In our cutting area, we keep the same basic setup every time:
- Hard surface first: Use a clean table or large cutting station, not carpet. Minky fibers cling to soft surfaces and are harder to contain once they spread.
- Large mat underneath: A self-healing mat keeps the fabric stable and gives your blade a cleaner path.
- Weights nearby: Pattern weights help more than pins during cutting because they hold the plush down without distorting the edge.
- Lint control within reach: Keep a lint roller or small vacuum nearby so cleanup happens immediately, not after the pile has spread to every chair in the room.
- Fresh blade ready: Don't “try to get one more project” out of a dull blade. Minky exposes that shortcut fast.
You can get more control tips from our tutorial on how to sew with minky fabric without it sliding.
Keep other fabrics off the table while you cut. Minky fluff has a talent for attaching itself to whatever you wanted to keep clean.
How do you check the nap before cutting
This is the step too many quilters rush. Minky has a directional nap, so every pattern piece needs to face the same direction if you want the finished project to look intentional.
For larger or more complex projects, expert guidance recommends marking the nap direction before the first cut and cutting each piece as a single layer, not on the fold, because reversed nap can make the sheen and hand look visibly different in the finished project, as noted in this guide to sewing with minky.
With textures like Luxe Cuddle Fawn or Hide, mismatched nap stands out right away. One piece reflects light differently, another feels smoother in the opposite direction, and suddenly the whole top looks patchy.
What prep mistakes cause the biggest mess
Three mistakes create most of the chaos:
- Cutting on the fold when the fabric would behave better in a single layer.
- Letting the yardage hang off the table, which stretches the knit backing and throws off your line.
- Dragging or shaking the plush around indoors before you've even made the cut.
If you need fabric that's already portioned for throws and blanket projects, our curated minky cuts can simplify the setup before you ever touch a blade.
What Are the Best Tools for Cutting Minky Fabric?
Tool choice matters more with minky than with most quilt fabrics. A blade that glides through Cuddle 3 can grab and drag on Luxe Cuddle Hide, and that is usually where the mess starts. In our shop, we match the tool to the texture first, then to the shape of the cut.
Independent sewing guidance also supports keeping the fabric stable and using a fresh rotary blade or sharp fabric scissors on a firm surface, with the reminder that some plush textures behave better under scissors than a rolling blade, as explained in this article on how to sew minky fabric.
Which tool should you reach for first
For long, straight cuts on standard Shannon Cuddle 3, I reach for a rotary cutter first. It is faster, cleaner against a ruler, and easier to keep consistent across wide cuts.
For thicker Luxe Cuddle textures, especially Hide, Fawn, or Snowy Owl, scissors often give better control. The cut takes longer, but slower is sometimes cleaner. If the pile shifts, bunches, or rides ahead of the blade, a rotary cutter stops being efficient and starts chewing the edge.
A craft knife or small straight blade has its place too. We use it for backing-side cuts on high-loft minky when the goal is to disturb the pile as little as possible.
Minky Cutting Tool Comparison
| Tool | Best For | Pros | Cons |
|---|---|---|---|
| Rotary cutter | Straight lines, gentle curves, standard Cuddle 3 | Fast, ruler-friendly, clean on stable backing | Can shift pile on some plush textures |
| Sharp fabric scissors | Short cuts, detailed shapes, dense or shifting Luxe textures | More control, easier to slow down, good for single-layer cutting | Slower on long cuts |
| Craft knife or blade | Backing-only cuts on high-pile or tricky textures | Precise when cutting from the back, low pile disturbance | Takes practice, less convenient for long ruler cuts |
How we decide between rotary cutter and scissors
Here is the test we use at OPN Quilting. Make one short sample cut on the backing side. If the fabric stays flat and the edge looks clean, keep going with the rotary cutter. If the pile starts creeping or the backing squirms, switch to scissors before you ruin a longer edge.
That trade-off saves time.
- Use a rotary cutter when the cut is long, mostly straight, and the backing stays flat under a ruler.
- Switch to scissors when the piece is smaller, the texture is dense, or the pile moves under the blade.
- Use a small blade from the back when you need the lowest-disturbance cut on high-loft Luxe Cuddle.
A sharp tool fixes more minky problems than extra pressure ever will.
If your project includes printed designs or placement-sensitive pieces, this guide to cut and sew fabric panels helps with the extra accuracy those layouts require.
What works well for common Shannon textures
We keep this shorthand in mind at the cutting table:
| Texture type | Tool that usually works well | Why |
|---|---|---|
| Cuddle 3 | Rotary cutter | Smooth, efficient, especially for straight sections |
| Luxe Cuddle Hide | Sharp scissors or backing cut with blade | Thick surface responds better to slower control |
| Luxe Cuddle Fawn | Rotary or scissors depending on pile movement | Nap and surface variation can shift during cutting |
| Luxe Cuddle Snowy Owl | Blade or scissors from the back | Dense pile stays cleaner with less surface disturbance |
Large backing cuts are the point where many home quilters decide the hassle is not worth it. On Pins & Needles Quilting Co. offers pre-cut lengths, extra-wide minky, and mail-in finishing options, which can be a smart choice when you are working with oversized pieces and want less handling on your table.
Shop note: First orders can use a 15% coupon, and U.S. orders over $70 qualify for free shipping.
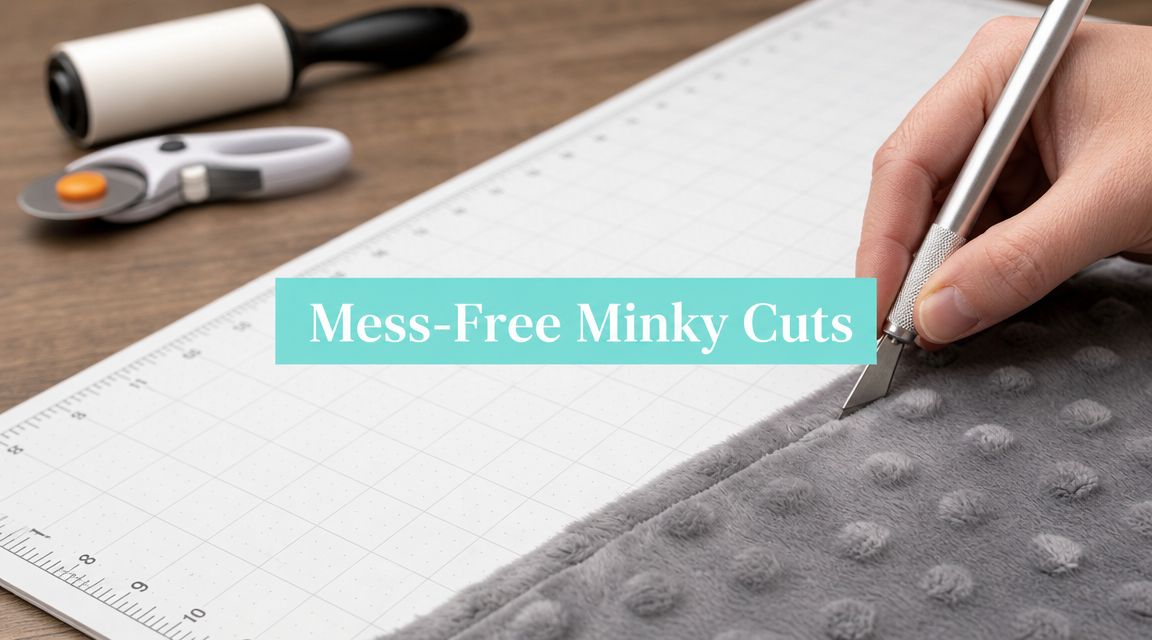
How Do You Actually Cut Minky Fabric Without the Mess?
You line up a clean cut on Luxe Cuddle, make the first pass, and suddenly the table looks like it snowed. The clean version of this job starts before the blade moves. Keep the fabric in a single layer, turn the backing side up, and cut the knit backing instead of forcing your way through the plush face.
That is the method we use in the shop because it gives the best balance of accuracy, control, and cleanup. It also lets you adjust by texture. Cuddle 3 usually behaves well with a rotary cutter. Dense or high-loft textures like Luxe Cuddle Hide or Snowy Owl often stay cleaner when I slow down and cut shorter sections from the back.

What does the cut look like
Lay the minky backing-side up and smooth it with your hands. Do not pull on it. Stretching now is how pieces end up shy later.
Mark the cut line on the backing if needed, then anchor the fabric with a ruler, pattern weights, or your free hand. On thick Luxe Cuddle, I part the pile along the line with a stiletto or the blunt tip of a seam ripper so I can see the backing clearly. That one step cuts down on stray fuzz and keeps the blade from wandering.
How to make the cut cleanly
Use light pressure and let the tool do the work. A sharp 45 mm rotary cutter is fast on straight runs, especially on smoother textures. For smaller shapes, curves, corners, or any texture that shifts under the blade, sharp fabric scissors give better control.
Our shop workflow is simple:
- Set the fabric backing-side up: Keep the knit backing visible the whole time.
- Hold it still: Use weights or a ruler without stretching the fabric.
- Open the pile at the cut line: Expose the backing before the blade touches it.
- Cut in controlled passes: Long straight cuts for stable textures, shorter strokes for deep pile.
- Separate the pieces gently: Lifting too fast shakes loose fibers into the air.
If you are cutting for a gift, this minky baby blanket tutorial shows how those neatly cut pieces come together without fighting the fabric later.
Here's a helpful visual demo to watch before your first cut.
What causes the mess fast
A few habits create problems every time:
- Stacking layers: Minky shifts too easily for reliable multi-layer cutting.
- Bearing down hard with the blade: Heavy pressure disturbs the pile and throws more fibers loose.
- Dragging the fabric across the table mid-cut: That spreads lint and can skew your line.
- Using one tool for every texture: What works on Cuddle 3 may fight you on Luxe Cuddle Fawn or Hide.
When to switch tools mid-project
Switch as soon as the cut stops feeling clean.
If the rotary cutter starts skipping or pushing the pile ahead of the blade, move to scissors. If a deep-pile texture is shedding more than expected, shorten the cut and work from the backing in smaller sections. In our shop, that decision is routine, not failure. The fastest method is the one that gives you a clean edge the first time.
For oversized backing cuts or wide plush yardage, this is also the point where many quilters decide to let a shop handle the cutting. That is often the cleaner choice, especially when your table is small or the texture is thick enough to fight every pass.
What's the Best Way to Clean Up and Finish the Edges?
Even a careful cut leaves some stray fibers. The goal isn't zero lint. The goal is keeping it contained.

How do you clean up without spreading it further
Start with the cut edges, not the floor. A lint roller on the edge of each piece grabs a surprising amount before the fibers migrate elsewhere.
Then do the cleanup in this order:
- Take pieces outside for a quick shake: Do this outdoors, not over your sewing chair.
- Roll the edges again: Especially on thick plush textures.
- Vacuum the table and mat: Don't brush fibers onto the floor first.
- Wipe your ruler and tools: The fluff likes to cling there too.
The fastest cleanup happens right after the cut, before the fibers have time to travel.
Some quilters also like a brief air-only dryer tumble with a damp washcloth to catch loose fuzz after cutting. The principle is simple. You want the loose fibers to release in a controlled place, not during the first use of the finished project.
Should you finish the raw edges
Yes, if the project calls for it.
A serger edge or a simple zig-zag stitch helps secure the cut edge and reduces later shedding during handling and sewing. It also gives bulkier plush fabrics a tidier, more durable finish.
If your project is moving on to binding, this beginner-friendly guide on how to bind a quilt pairs well with minky-backed work.
For quilt projects that need backing fabric and finishing supplies together, you can also browse minky quilt backing options to match the edge treatment to the project from the start.
Is It Ever Better to Have a Shop Cut Your Fabric?
You clear the table, wrestle a big piece of Luxe Cuddle onto the mat, line up one edge, and realize the fabric is hanging off two sides and pulling out of square. That is usually the moment to let a shop do the cutting.
I still cut plenty of minky in-house for smaller projects, strips, and trims. But bed-size backs are a different job. Thick Shannon Fabrics textures like Luxe Cuddle Hide, Marble, and Rabbit have enough weight and loft that the fabric can shift while you are still trying to get your first clean line. If your table is small or your ruler control is not solid yet, shop-cut yardage often gives a better starting point than a frustrating home setup.
It makes the most sense in a few specific situations:
- Large quilt backs: Wide minky needs a broad, flat surface to stay square.
- Plush, high-pile textures: Some Luxe Cuddle styles are easier to manage once, at the cutting table, instead of being spread and re-spread at home.
- Time-sensitive projects: If the goal is to get to piecing or binding, pre-cut yardage removes one of the messiest prep steps.
- You know you dislike cutting minky: That is reason enough. Save your energy for the part of quilting you actually enjoy.
At OPN Quilting, we usually tell customers to cut their own fabric when the piece is small enough to control with a sharp 45 mm rotary cutter and a long ruler. We tell them to consider shop-cut help when the fabric is extra wide, the project is bed-size, or the texture is thick enough that accurate squaring becomes the hard part. This is the trade-off. Cutting your own gives flexibility. Having it cut for you gives consistency.
If you want the feel of Shannon Cuddle or Luxe Cuddle without handling the full prep yourself, ready-to-cut options like 2-yard minky cuts and 110-inch extra-wide minky can make the project much easier to start.