
A single charm pack looks generous in the wrapper, and then the seams take their cut. Once you plan a charm pack quilt from finished size, backing overage and batting overage instead of from the pretty stack, you stop buying one pack too few and you stop finishing a top that no longarm can load cleanly.
How Many Packs Does a Charm Pack Quilt Need?
A standard charm pack holds 42 squares, so a charm pack quilt needs the squares your pattern requires divided by 42, rounded up, plus a reserve square or two.
Each 5-inch square finishes at 4.5 inches after quarter-inch seams. Every joint between two squares takes half an inch out of the row, so eight squares finish at 36 inches, not 40. That shrinkage is what leaves a top smaller than the backing and batting plan built around it, and both layers need extra inches past the top on every side for longarm loading.
How Do You Work Out the Finished Center?
Count the grid, multiply by the finished unit, then add any unfinished edge allowance your border plan needs. A 64-square baby quilt on an 8 by 8 grid needs two packs and gives a center of about 36 inches square before borders. One pack in a 6 by 7 grid makes a top of about 27 by 31.5 inches.
A 7 by 7 grid needs 49 squares and two packs, finishing at about 31.5 inches square. If your pattern states squares instead of a grid, trust the square count first, and keep the reserve: one miscut or one print that lands wrong can force a layout change. Throw and twin sizes follow that same division once the pattern sets the count.
| Quilt or layout | Squares needed | Packs (42 squares) | Finished size or note |
|---|---|---|---|
| Baby quilt, 8 by 8 grid | 64 | 2 | About 36 inches square before borders |
| One pack, 6 by 7 grid | 42 | 1 | About 27 by 31.5 inches |
| 7 by 7 grid | 49 | 2 | About 31.5 inches square |
| 40 by 40 in pattern | 81 | 2 | 9 by 9 grid, about 40.5 inches |
| Full-size | 456 | 11 | Estimate from the charm quilt history below |
| Queen | 480 | 12 | Estimate from the charm quilt history below |
| King | 600 | 15 | Estimate from the charm quilt history below |
What Do the Big Quilt Estimates Mean?
Bed quilts expose the cost of precuts fast. A history of yesterday's and today's charm quilts estimates about 456 finished 5-inch-cut squares, or 11 standard 42-square packs, for a full-sized quilt, 480 squares, or 12 packs, for a queen-sized quilt, and 600 squares, or 15 packs, for a king-sized quilt.
Charm quilts trace back to the nineteenth century, when makers built them for fabric variety. Traditional versions repeated no identical fabric and often used one-patch construction, sometimes reaching hundreds or thousands of pieces. Modern packs relax the no-repeat rule, which makes planning easier but makes print balance your job.
Planning check: Count the squares in the pack you hold before you cut a thing. Manufacturers vary, and one missing square changes a tight layout.
Before you buy, work through our guide to calculating yardage for quilts so background, borders and binding don't become a second surprise order. If you already know you want soft fabric on the back, browse the Luxe Cuddle collection while you're planning, not after the top is done. That order matters because extra-wide backing can change whether you need a pieced back at all.
Which Layout Suits 5-Inch Charm Squares?
A Diary of a Quilter guide to charm square quilts describes the standard pack as 42 fabric pieces measuring 5 × 5 inches each, popularized by Moda Fabrics in the early 2000s. That's about 1,050 square inches before seams, and each square finishes at roughly 4.5 × 4.5 inches. In a simple 6-by-7 grid, that guide puts one pack at approximately 27 × 31.5 inches before borders, sashing or alternate blocks change the size.
Original packs held one square of each print. Later packs often repeat prints when a collection has fewer than 42 designs. Check that print count before you promise yourself a scrappy look with no repeats.
| Layout | Squares per unit | Extra fabric beyond the pack | Best use |
|---|---|---|---|
| Simple grid | 1 square per unit | Little or none | Table runners, pillows, wall hangings |
| Nine-patch | 9 squares per block | Little or none | Blocks that show print variety |
| Snowball and pinwheel | Squares cut into corners or triangles | Background fabric needed | Scrappy blocks with contrast |
| Half-square triangles | Larger starting squares, trimmed after sewing | Background or larger squares | Graphic patterns with diagonal seams |
Which Layout Should a Beginner Pick First?
We recommend the simple grid for a first quilt. It's the fastest way to learn seam control on table runners, pillows and wall hangings, and it uses the pack as sold. Move to nine-patch once your cutting and quarter-inch seam feel steady, and plan block counts in multiples of nine.
Snowball and pinwheel units cut corners or triangles, so they need background fabric beyond the pack. Half-square triangles lose fabric along the diagonal and usually need starting squares larger than 5 inches so you can trim the unit true. That extra yardage isn't a flaw, but it does change cost and finished size.
Confirm whether your pattern calls for whole 5-inch squares, oversized squares for trimming, or finished units at 5 inches. Those three phrases mean different yardage. Our roundup of charm pack patterns helps you match the wording to the fabric, and you can add solid background fabric at the same time if contrast is doing the design work.
How Do I Cut and Lay Out a Charm Pack Quilt?
A charm pack earns its keep on the design wall. For a simple grid the squares go in as sold, so your real work is arrangement: where each print sits and which neighbors it gets. An HC Quilts guide to charm packs gives the same warning we do: published finished sizes vary by pattern, so measure your sewn rows before you cut a single border strip.
When a layout does call for cutting, finish it before anything touches the wall. Cut every nine-patch piece, snowball corner and triangle in one sitting, and bag the offcuts by block type. Mixing cut units and whole squares mid-layout is how a row gets resewn at midnight.
Use this visual walkthrough before you move squares around for real.
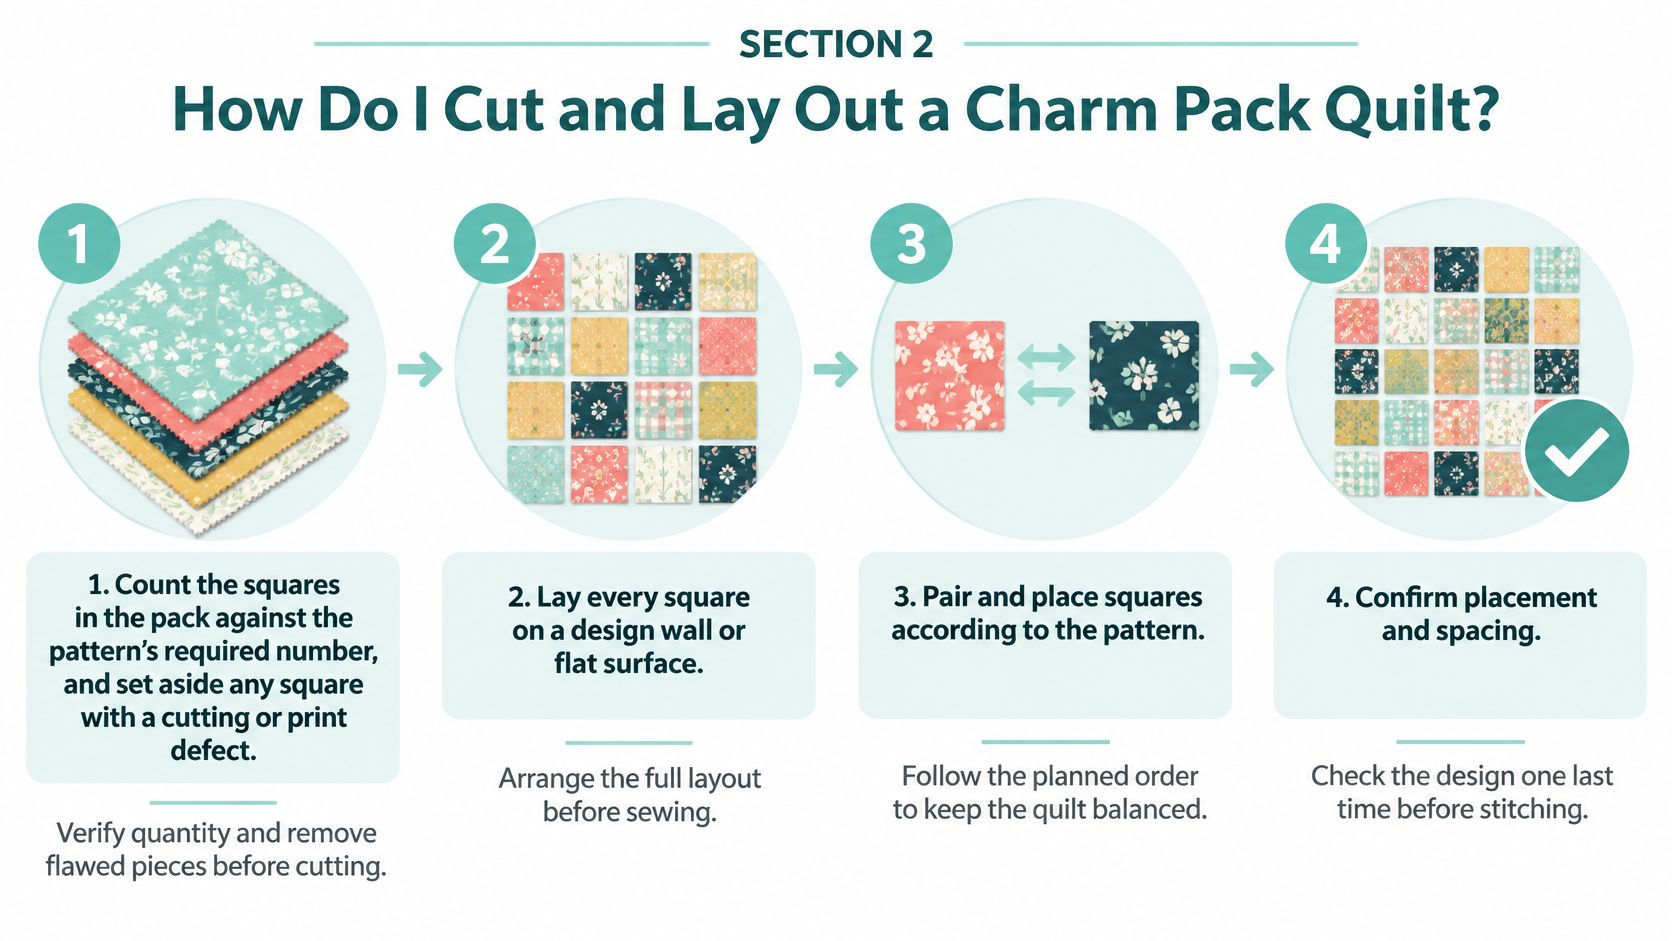
- Count against the pattern. Set aside any square with a cutting or print defect before it lands in the middle of the top.
- Use a design wall. You judge color flow better from a distance than you do looking down at a bed.
- Spread high-contrast prints. Don't let two squares of similar value sit side by side unless you're building a deliberate low-volume area.
- Photograph the arrangement. Sewing scrambles rows, and the photo becomes your reference when your memory says otherwise.
- Stack each row left to right. Pin a label to the first square of each row so row three doesn't become row six.
- Hold back two reserve squares. Keep them from the second pack for border fixes, a bad cut or a print that fights the rest.
Our offer: Get 15% off your first order and free shipping on orders over $70.
How Many Squares Does Each Grid Use?
A 6 by 7 layout uses 42 squares, a 7 by 7 uses 49, and an 8 by 8 uses 64. Two packs therefore leave spare squares for print balance, defect swaps and directional prints you'd rather rotate out. Don't spend every spare in the layout just because it's in your hand.
Watch this short layout demonstration, then photograph your own wall before you stack a single row.
Once the top reads well from across the room, pick the back while the colors are in front of you. The Luxe Cuddle collection is where we'd start for a matching minky backing, especially if you want Shannon Cuddle softness without piecing narrow widths. Take a phone photo of the top next to your screen choices, because monitor color and quilt color rarely agree on the first try.
How Do I Sew the Top Square Without Ripples?
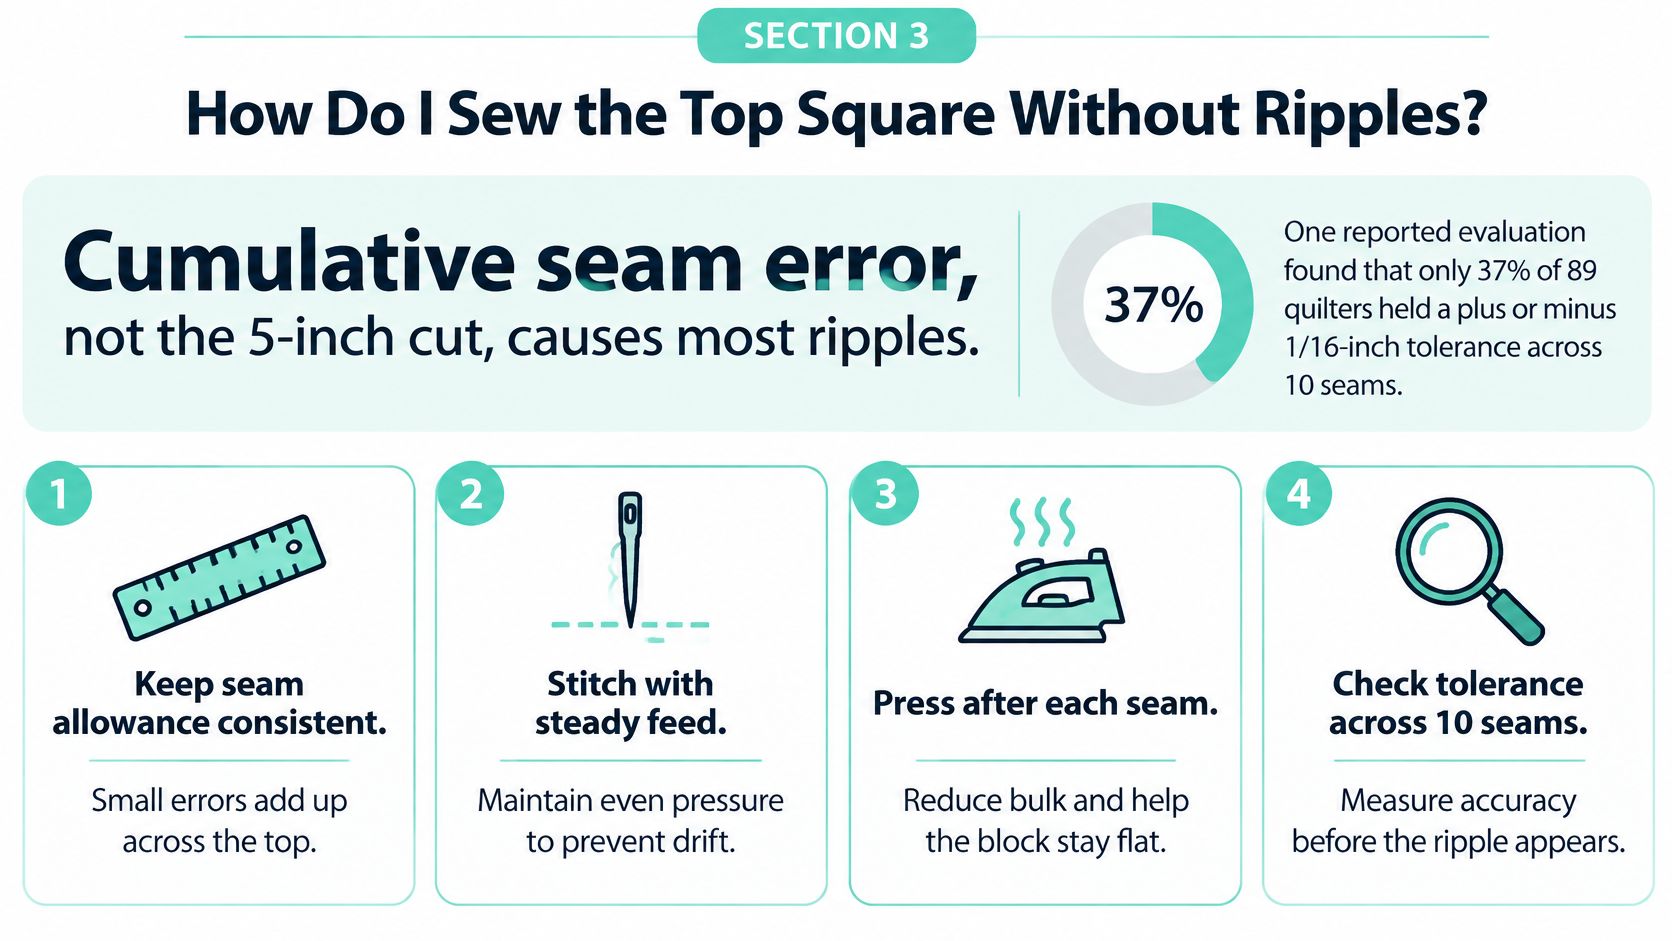
Cumulative seam error, not the 5-inch cut, causes most ripples. An independent quilting evaluation from Handmadelytics reported that only 37% of 89 quilters maintained a ±1/16-inch tolerance across 10 consecutive seams without rechecking. That result is why we treat a test seam as part of the job, not as a beginner extra.
Keep this checklist beside the machine while you sew the first rows.
What Test Should You Sew Before the Grid?
- Set your guide. Fit a quarter-inch foot or tape a clear guide line on the machine bed.
- Sew two test squares. The finished pair should measure 9.5 inches unfinished.
- Sew a four-square block. It should measure 18.5 inches unfinished if your seam is true.
- Adjust before production. If either unit is narrow or wide, move the guide now, because fixing one test unit beats ripping eight rows.
- Set, then press. Set each seam with the iron first, press without dragging, and stick to one system.
- Pin every intersection. Match crossing seams before the unit reaches the needle, especially where four corners meet.
- Square and record. Write down the actual width and length of the finished top for your backing order.
Which Pressing System Works Best?
Press toward the darker fabric if show-through is your worry. Alternate direction by row if you want seams to nest at intersections, which helps corners meet without a fight. Don't mix systems halfway through because you'll create a checkerboard of thick and thin crossings.
Never stretch a short row into alignment to make the ends meet. You'll sew in a wave, and quilting makes that wave more visible, not less.
The second common mistake is pressing every seam the same way across the whole top. You build bulky intersections that rock under the presser foot and later under the longarm hopping foot. With thick batting or plush backing, that bulk is where skipped stitches and pleats like to start.
Sew at a steady speed and remeasure after the first full row. A row that's off by a small amount points to your guide, while a row that shrinks only at the end usually points to fabric drifting as you finish the seam. Correct the cause instead of easing the next row to fit, because easing transfers the error into the border.
When the top is square, read our 10 quilt prep tips for longarm quilting before you fold it for storage. Threads trimmed, seams checked and actual measurements recorded will save you a round of emails later. A top that lies flat on your table is a top we can quilt without pleating fullness into the corners.
What Backing and Batting Size Does My Top Need?
Your backing should be at least 4 inches longer and 4 inches wider than the top. That's the rule that decides whether we can load the quilt with enough fabric to clamp, advance and quilt off every edge. Short backing is the fastest way to turn a ready top into a delayed order.
- Backing layer: Cut or buy at least 4 inches of overage in both length and width beyond the measured top.
- Batting you supply: Send batting at least 3 inches larger than the quilt top on each side.
- Quilt top: Square it first, then record the actual width and length you measured after pressing.
Don't pin or baste the three layers together before shipping. We load top, batting and backing separately on the frame, and basted layers have to be taken apart first. Send them clean, flat and clearly identified.
How Do You Choose a Minky Backing Texture?
Shannon Fabrics Cuddle is the brand's minky line, and quilt textures within it look and feel different in use. Hide gives you a more textured, hide-like surface, Snowy Owl reads softer and more plush in the hand, and Fawn brings a gentle, natural look to baby and throw quilts. Choose by how the quilt will be used, then confirm pile height and weight on the product page before you order.
Stop struggling with bulky seams in your quilt backs. An extra-wide backing without a center-back seam reduces bulk at the frame and keeps the back pattern unbroken. Standard widths still work, but place the seam carefully and press it flat so it doesn't ridge through the quilting.
For minky, stabilize the top and never stretch the plush backing during handling. It shows pressing marks, so keep a hot iron off the pile and let the frame tension do the flattening. Our guide on how to choose quilt backing walks through width choices, and you can shop Hide, Snowy Owl and Fawn textures once you've picked a direction.
Talk through the design with us before you ship if you're unsure. We can match pattern scale and thread to your vision while there's still time to change the backing. That short conversation prevents the common mismatch of a dense quilting pattern on a quilt you wanted drapey and soft.
How Do I Bind and Finish a Charm Pack Quilt?
Binding isn't decoration you add if time allows. On a charm top it hides the stepped edges of 5-inch squares and protects the perimeter seams that take the most handling. Measure again after quilting before you cut strips, because quilting can draw a top in slightly.
- Quilt the layers. Stitch in the ditch along seam lines for a quiet finish, or sew straight lines every two squares for stronger texture.
- Trim square. Cut batting and backing flush with the top edge so the binding doesn't have to hide a wavy sandwich.
- Cut double-fold strips. Cut binding 2.5 inches wide, join strips with diagonal seams and press in half lengthwise.
- Attach and miter. Sew binding with a quarter-inch seam, miter each corner, then hand-stitch the folded edge to the back.
A longarm finish returns the quilt trimmed and ready for this binding step. If you're new to corners, our beginner walkthrough on how to bind a quilt shows the fold sequence in order. Don't rush the final hand stitches, because loose binding catches, folds back and wears first.
Should I Quilt at Home or Book a Longarm?
Quilt at home if the top is small, your machine throat fits it comfortably and you enjoy the quilting itself. Send it out if basting on the floor, fighting drag under a domestic machine or storing an almost-done top is why your quilts stall. Our Mail-in Longarm service exists for that second group, and we have hundreds of verified reviews from quilters who sent in charm pack and minky tops.
- Square and measure the top after final pressing.
- Cut backing and batting to the overage sizes your quilting method needs.
- Book the order with pattern, thread and notes in one pass.
Machine quilting orders move through seven steps, Size, Pattern, Thread, Backing, Add-ons, Notes, and Review. Mail-in quilting includes standard thread, patterns, Quilter's Dream 80/20 request loft batting, and free standard return shipping to the lower 48 USA states. If you can't choose a pattern, select Quilter's Choice in the notes and we'll match one of our favorite patterns to your top.
Read how our mail-in longarm quilting services with free shipping handle intake before you box anything. You'll also get 15% off your first order and free shipping on orders over $70 where that offer applies to your cart. When your charm pack quilt top is flat, measured and paired with backing, it's ready to become a finished quilt instead of a folded promise.
Book Your Longarm Service Today
Your charm pack quilt deserves backing that's wide enough, quilting that lies flat and binding that protects every 5-inch square you pieced. At On Pins & Needles Quilting Co., we stock premium Shannon Cuddle and Luxe Cuddle backings and finish tops through mail-in edge-to-edge longarm quilting with thread and batting included. Visit On Pins & Needles Quilting Co. to shop your backing, pick your pattern and send us the top you've already done the hard work on.